When you enter a building and find water all over the floor, it’s always a jolt—but discovering that the culprit is a running toilet can be downright maddening. In the video “Emergency Toilet Repair | Flood at the Outhouse,” Roger Wakefield tackles a similar situation: he arrives to find an older, leaking toilet with an angle stop that didn’t completely shut off, leading to an unexpected flood. Below, we’ll walk through the key points of this real-world repair, explaining how Roger installed a new toilet, replaced a faulty shutoff valve, and confirmed that all was watertight before calling the job done. Whether you’re a DIY enthusiast or a licensed plumber, you’ll learn what to watch for when emergency toilet repairs are on the to-do list.
Identifying the Leak and Initial Assessment
When water shows up in a hallway or bathroom unexpectedly, the first step is understanding where it’s coming from:
- Leaking Fill Valve: A continuously running fill valve can overflow the toilet tank or allow water to drip onto the floor.
- Broken Angle Stop: If the shutoff valve (angle stop) fails to close fully, the toilet keeps receiving water even if you twist it off.
- Worn Flapper or Bad Wax Ring: Though common culprits, these were not the primary issue here.
In this scenario, the angle stop hadn’t effectively shut off, leading to a constant flow of water. Once Roger confirmed the water was indeed coming from the toilet’s supply line, he removed the old fixture entirely, preparing to install a new bowl and tank.
Turning Off the Water Supply
Even if you have a leaking toilet, you need to be able to stop water flow somewhere:
- Main Shutoff: If the local angle stop doesn’t work, find the main shutoff for the building.
- Drain Down the Remaining Water: Open a nearby faucet or tub valve to relieve pressure so you can safely remove old components.
Roger used the building’s main water supply shutoff and bled the remaining water from a nearby bathtub so that the pipe he was working on wouldn’t be under pressure during repair.
Removing the Old Toilet
With water flow halted and pressure relieved:
- Detach the Supply Line: Sometimes you’ll see corrosion or stuck threads, so have pipe wrenches or pliers ready.
- Unscrew Floor Bolts: These typically hold the toilet flange in place. You’ll remove the plastic or metal caps and then loosen the nuts.
- Lift and Tilt the Toilet: Move it off the flange carefully. If there’s a lot of water in the bowl, tilt slowly to prevent spills.
In Roger’s project, the toilet had been removed already, but the wax ring and older bolts needed cleaning up.
Replacing the Angle Stop
A crucial part of this repair involved swapping out the angle stop. The existing stop had a missing washer and was soldered poorly, yet it had functioned long enough to avoid major leaks—until now. Roger’s approach:
- Unsweat or Cut Off Old Valve: He heated the existing solder joint to remove it.
- Clean and Prep the Copper: Scrape away old solder and use sandcloth or a brush to create a clean surface for the new fitting.
- Install a New Quarter-Turn Angle Stop: Roger opted for a sweat-on (soldered) version for reliability. Some people prefer compression or push-fit valves, but sweat fittings are time-tested when done correctly.
- Ensure a Good Solder Joint: Heat the pipe and valve evenly, then apply solder so it melts and wicks into the joint. Wipe excess solder gently for a clean finish.
Once installed, Roger turned the main water back on to test for leaks. It’s wise to keep a towel handy or a bucket under the newly soldered joint in case a small leak shows up.
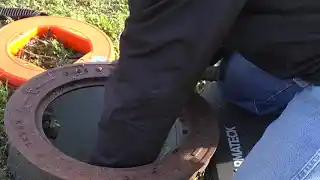
Preparing the Flange and Floor Bolts
With the old toilet out of the way:
- Scrape Off Old Wax: Use a putty knife to remove the leftover wax ring from the flange.
- Inspect the Flange: Roger found a sturdy brass flange in good condition, which simplifies the replacement. If it were cracked or corroded, a flange repair ring or full replacement might be required.
- Install New Bolts: Quarter-inch or five-sixteenths-inch bolts are typical. Align them so the toilet base slides right over them.
Seating the New Wax Ring and Toilet
Roger prefers to put the wax ring onto the bottom of the bowl first, not on the flange. This ensures a snug fit:
- Press the Wax Ring onto the Bowl Outlet: Center it carefully and give a slight twist to secure it.
- Lower the Bowl Over the Flange: Aim to align the bolts through the toilet’s base holes.
- Gently Rock the Toilet Down: This compresses the wax ring for a watertight seal.
- Tighten Floor Bolts: Alternate sides, tightening gradually so you don’t crack the porcelain. Add washers and caps as needed.
Reconnecting the Water Supply and Testing
After the bowl is bolted:
- Attach New Supply Hose: Roger used a compatible hose for the quarter-turn angle stop.
- Turn Water On: Slowly open the new valve, allowing water to fill the tank. Check around the base, flange, and supply connection for any drips.
- Flush Multiple Times: Confirm that the water level stabilizes correctly and that the toilet flushes properly without leaks or hissing fill valves.
In Roger’s case, the new toilet and valve functioned as expected. He also cleaned the porcelain thoroughly, removing chemical residues or manufacturing oils so the fixture was spotless for the next user.
Key Takeaways and Best Practices
- Always Inspect the Angle Stop: If you discover it doesn’t fully shut off, replace it before installing a new toilet.
- Check the Flange Condition: A solid flange means simpler installation. Replace or repair if there’s any doubt.
- Choose the Right Wax Ring: Standard or wax ring with a horn depends on your preference and the toilet design.
- Ensure a Good Solder Joint: Clean copper thoroughly. Use flux sparingly. Heat the fitting uniformly.
- Test Thoroughly: Open the main supply, flush the toilet multiple times, and watch for hidden drips or slow leaks.
Avoiding Future Floods
The flood happened because a continuously running fill valve combined with an angle stop that didn’t seal. If you notice a toilet that won’t stop filling, turn off water at the main if the local valve doesn’t shut it off completely. Then schedule a fix right away. A minor constant leak can turn into a significant water damage event if overlooked.
Final Thoughts
A running toilet that leads to a flood is a plumber’s nightmare—and a building owner’s worst surprise. But a well-executed repair job, like Roger’s, ensures it won’t happen again. By swapping out the faulty angle stop, cleaning and re-soldering the pipe properly, and installing a fresh toilet, Roger restored full functionality to this outhouse-turned-podcast studio bathroom. The key lesson: never ignore small leaks, and always verify that your shutoff valves do their job.